I developed Hair Tool addon for blender to simplify creation process of low/medium poly hair models
This addon will help you generate hair mesh ribbons with uv’s from bezier/nurbs curves. It is how most current games are doing hairs for characters.
Hair Tool workflow
Some features:
ability to generate and interactively comb hair ribbons based on blender particle hairs (since 1.8 version)
generating hair ribbons from guide mesh surface
ability to uv unwrap and preview textures on hair curve ribbons
easy and convenient switching back and forth between curve ribbons and mesh mesh, while preserving uv’s
ability to adjust ribbons radius profile over strand length to taper the ribbons shape
ability to convert stuff eg: Grease Pencil strokes to Particle Hair or Curves ribbons, Curves to Particle Hair, Particle Hair to curve ribbons
generating randomized ribbons UV’s (you can draw multiple uv boxes, that will be randomly picked for each ribbon strand).
Curve Resampling – increase, decrease curve/ribbon points amount, while preserving it’s tilt and radius.
Generating vertex color/weights gradients for ribbons.
And More!
Video tutorial mostly about generating curves from mesh surface, with some tips and tricks, problem solving and stuff. Video showing: creating particle hair from grease pencil, generating curve ribbons from parent particle hair with children, resampling curve ribbons and other stuff.
Videos showing interactive hair ribbons combing :First, Second (includes new curve clumping) Video showing material material setup on curve ribbons, and new modeling tool for curve ribbons- ‘Linear deformer‘ – tool can be found on github here.
Old Video about hair shader: https://vimeo.com/229043427 Old Video about creating texture: https://vimeo.com/228873075
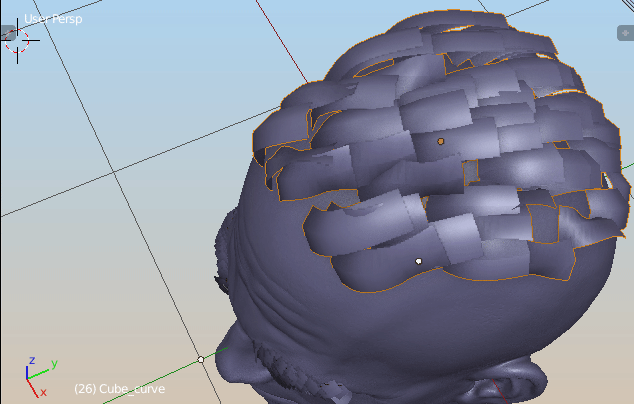
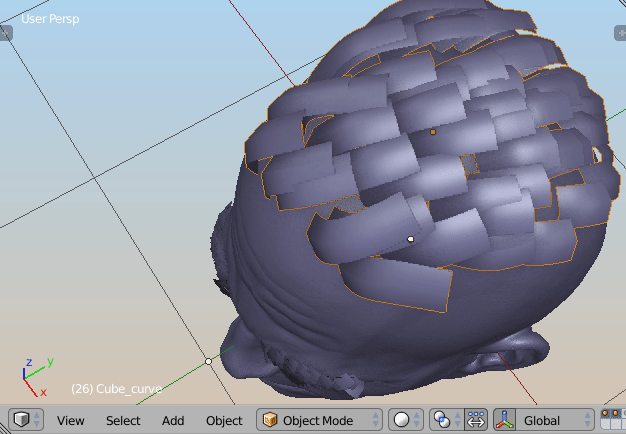
Basic workflow for generating curves from mesh surface:
First step is to generate base shape of hair. For that use grid mesh, created only of quads. Mark one border of this mesh with sharp edges – those will become roots of hair splines:
Press ‘Curves from surface‘ button located in left Tool Shelf -> Tools, to generate curves from selected object. Generated curve settings can be modified using ‘F6‘ hotkey. You can adjust stuff like hair amount, length, add some noise etc. Or you can do some manual tweaking here going into curve ‘Edit mode’.
To add ribbons profile to generated curves, press ‘Generate Ribbons’ button. There are some settings to play with under ‘F6’ hotkey. Use ‘Align tilt’ to align curves rotation to source mesh (head)
You can now uv map curve ribbons by going into UV editor and search for ‘Hair UV’ operator under spacebar. Left click and draw rectangular shape, in uv Editor, to define the uv bounds for hair strands. If you assign material to curve ribbons, use ‘Curve Ribbons UV refresh‘ to update material uv mapping. You can convert curve hair to mesh ribbons by using ‘Curve ribbons to mesh ribbons‘ – now they can be exported to game engine. Any time you want, you can go back to curve ribbons by using ‘Mesh ribbons to Curve ribbons‘.
Curve Ribbon operations:
Curve Simplify- Allows to reduce point count. Good for reducing polycount on hairs . Resample Curve. Allows to increase/decrease number of points each curve is made of. It keeps the original strand radius and tilt. Smooth Curve – smooth strand points (eg. to reduce noise) Smooth TiltTaper Curve – change strands radius over length Align Curve tilt – lets you align cure tilt to target object surface. Randomize Curve Tilt – change curve tilt over its length Select Tips/Roots – lets you select first/last points on curves. There is randomize option under F6 properties.
Mesh Ribbon operations:
Add Ribbon Vertex Color – create black and white color gradient from strand root to tip Add Ribbon Weights – create vertex weight gradient from strand root to tip UV hair operator (found under spacebar) – Left click and draw multiple rectangular shapes, in uv Editor, to define the uv bounds for hair strands. Press enter to confirm.
Interactive hair combing:
Interactive Hair Combing – panel is displayed in left Tool Shelf, when combing Blender particle hair. Enabling it will generate interactively updated curve hair ribbons. In that panel you will have option for smoothing, embedding, aligning tilt etc. of generated strands.
Convert operations – let you convert Particle Hair to (ribbon curves), curves to Particle hair, Grease Pencil to Curves etc.:
Ribbon to Curves/ Curves to Ribbon – allow for switching between ribbon curve and ribbon mesh state. Usually you will want to do hair modeling in curve state, and then do UV in ribbon mesh state. Particle Hairs to Curve – generate curve ribbons from Particle hair. Align their tilt to head with ‘Align Tilt’ checkbox, and embed hair roots deeper into the scull using ‘Embed Roots’ parameter. Particle Hair from Curves (this can be used to convert zbrush fibermesh to blender Particle Hair system). Select curves and target mesh (that will receive Particle Hair) and use ‘Particle Hair from Curves‘ to convert curves object to blenders Hair system. ‘Ribbons from particle hair with children‘ – gives more evenly distributed result compared to build-in child particles . Great for short Hair. ‘Particle Hair From Grease Pencil‘ strokes painted with grease pencil, can be converted to particle hair (with some options available under f6). Checkbox next to this button, describes if you want to use Scene GPencil data (when enabled), or Object GP data (when disabled).
‘Flip UV’ option in preferences – if enabled random strands will have uv’s flipped in X-axis.
Grease Pencil to curve – quickly sketch gprease pencil guides, that will be converted to curve ribbons. Use F6 for options. If you run this operation with curve hair selected, it will add new curves to it. If you run it with mesh selected, then it will be used for as target for ribbons aligning and offset. Braids from curve – just select Source curve, and run ‘Generate Braids’ on it. As usual there are some options under the F6 button. After you are finish, original Source curve can influences the generated braid so you can twist it (ctrl +T), scale radius (alt+s) to change the sape of braid.
I was going to make tutorial this weekend, but coding new update took longer that expected (I can do one thing only at time 😀 ). There are many new goodies with 1.2 release. But I still plan making tutorial. For now I can say hair texture was hand painted with PaintStorm Studio. Great app!
I messed up the 1.2 file. I re-uploaded it again on gumroad – so when you get hair_tool_1.2.zip, and install it from blender->prefference> addons> install from file, it should work great. Sorry for inconvenience.
You’re a man of wonders, you know that ? Keep up the good work ! I’ll help you spread the news in Vietnam’s blender community.
it would be great to have a tutorial of how the addon works
Hi! Just bought your addon, from the looks of it, it seems it may free me from the hell that is hair making!
Do you know how to recreate the anisotropic effect in internal? Or in something like shader forge for unity?
This seems like something much more useful for realtime game ready characters rather them cycles renders.
Some people seem to bake normals from a smooth shape like a sphere to strangers hair, will this be needed with your addon?
There seems to be ‘Tangent shading’ checkbox in BI, so It should be possible to make similar shader there. About shaders for unity – well I don’t know it, but all moder game engines are supporting stuff like anisotropic materials through some tricks. I know in unreal there is demo scene with hair shader that you can modify to your needs. But it is bit complicated to understand the node setup. We have technical guy for that 🙂
About baking normals from one mesh to another it is already posible in blender just use Data transfer modifier. – firs image has the setup for what you need. I takes 5 clicks to setup.
Um I know I may sound a little stupid, but how do you mark sharps? what do you use to do that? Is it the same as marking seams? Is there a different place I have to go? you don’t say anywhere what a sharp is or how to make one.
I was doing exactly this today at work. I think using particles and instance many random 2d bilboards with it, is way to go. I will be testing this approach tomorrow.
how did you testing for tight curly hair turn out?
I won’t be able to show this in public, but the basic workflow was: make shpere, make plane – use poke tool on it, and push vert in the center slightly inside. Then scatter this plane on shpere using particles. And for curly hair texture I used zbrush fibermesh, buy you can use blender hair particles with child curls to get something like http://prntscr.com/gbc1qt
I love this so far!!!! this is amazing. I think the one thing I wish it did was add the noise values to the hair ribbons generated by particle strands.
Oh and when I created a second hair “clump” with this, it tells me the first mesh cannot be a shared user group and to remove the user group. I think this is easily solved by me changing the name of the hair clump.
Seriously though, thank you for this addon. I’m looking forward to more updates and I heavily support it through the community ❤
The thing about adding noise to blender particle hair is, that blender already has build in noise features in particle child strands. It is explained here – https://youtu.be/EVj1fETtuN8?t=565. About second hair clump – it is a feature not an bug. It lets you preview particle hairs as ribbons, and if you don’t like it, just tweak hair particles, and generate them again – old ribbons will be automatically updated. And as you discovered, if you want new ribbons, just rename (or duplicate) old one.
Cześć, właśnie kupiłam twój addon. Niestety mam problem ze skrótem F6… a konkretnie, po wciśnięciu opcji add ribbon to curves skrót F6 działa tylko raz… jeśli sobie kliknę w międzyczasie gdziekolwiek indziej to ten skrót przestaje działać… Z resztą przy tworzeniu krzywych także zdarza się że nie działa i muszę restartować blendera. Tak chyba nie powinno być? Używam wersji 2.78
Cześć, właściwie to chyba nie jest bug. Włączając dowolny operator w blenderze można uzyskać dostęp do jego opcji przez f6, ale tylko bezpośrednio po użyciu danej funkcji. Mam juz na liście rzeczy dodo, dodanie zapamiętywania opcji danego operatora. Na razie może można zmienić szerokość ribbona przez zmianę promienia krzywej (alt+s), a liczbę podziałów w poprzek możesz zmienić we panelu właściwości krzywych – parametr ‘Preview U’. Czy coś takiego wystarcza? I jeszcze jedno addon ma błędy w wersji blendera poniżej 2.78c. Więc zalecam aktualizację do wersji 2.78c
Dzięki za odpowiedź, już trochę się z tym oswoiłam. 😉 Dziękuję również za przydatny skrót, to bardzo ułatwia sprawę! Naprawdę świetny addon, fajna alternatywa dla wiecznie crashującej Majki. 😉
Hi amazing plugin. I just have one questions. How can I use fibermesh with this plugin. I exported the curves from zbrush as obj and imported into blender but I dont know how to convert it to curves.
Yes, it is possible in 1.4 release. Steps are:
– join imported fibermesh obj, with ‘alt+j’ command
– then convert this merged object to curves – with ‘alt+c’ – Curves from mehs
– finnally select curves, then head object – and attach those curves with ‘Particle hair from curves’ option in Hair Tool panel.
Just to make sure I understood this right (now that I bought it already.. — damn I should have read this here before!): It’s NOT possible, to get particle hairs from a pre-existing mesh with this addon? Aka: make particle hair from curves that we created after a mesh there? o.o
There is option – ‘Particle hair from curve’ but thing is, if curves were crated from mesh object – the direction of those curves may go in different directions. You would have to unify curves direction before converting them to Particle hair.
Hi, question how are you did customized pie menu?(On this moment – https://youtu.be/WE0aBe8SNls?t=59 ) and how are you did this opened window? When you press button open window settings of hair(on this moment – https://youtu.be/WE0aBe8SNls?t=104 ) I hope you understand 🙂
Custom pies were created using this Pie Menu Editor – great addon. About properties popup – they can be opened using F6 button. This is standard blender behavior when executing any operation – not just when using Hair Tool.
How the heck do you install this? I bought version 1.4 but haven’t had the time yet to get around to testing it out (so now I was sent 1.5). I tried copying all the python scripts into Scripts/Addon but that didn’t work. Then I tried “Install from File” for each one but no luck there, either. I’m using the latest Blender and I can’t see this tool anywhere (I had Sensei activated, but even turning it off and going through the above doesn’t help).
The file structure should be like this: http://prntscr.com/gpudsx
So all your ‘Hair Tool’ files should be inside this folder: C:\Users\YourUserName\AppData\Roaming\Blender Foundation\Blender\2.79\scripts\addons\hair_tool
I it should work with both 2.79 and 2.78c. I’m not sure about sensei format – but can you try default bledner build from blender.org?
Even on a brand new installation of Blender, with my stuff in the same directory as yours (although I don’t have ALL those python scripts — I only have six of them and only six came with 1.4 as well so I’m not sure where you are getting the rest) this doesn’t work. The hair tool doesn’t show up in Tools nor does it show in Modifiers — so I’m lost.
Okay, I’m an idiot (well, at the very least, a Blender newbee). I keep looking for the tool by alphabetical order (so Hair Tool) instead of under the Catergory:Order it is in addons. So I found it and activated it and at least have it showing. You can ignore my problems for now (sorry).
That is weird, maybe try cleaning cookies or different browser? I tried opening links in both opera and firefox and both worked ok. Or manually copy link, and paste in new tab… I have no other ideas.
It’s coming up that way in all my browsers — I suspect YOU don’t see it because you have a paid Vimeo account (or perhaps your Vimeo account is just logging you in automatically). Also, there is something odd about that link — try coping it and pasting it into Notepad and you’ll see. WordPress does an auto re-direct. However, I *was* able to get to that video by just manually typing in the link (so not by clicking or copying). Just a headsup as there may be many who can’t see your videos.
I SO desperately want to be able to use this — and I feel like an idiot. I’m following along your new tutorial, drawing grease pencil strokes (on an object) and then, with object selected (and no scene in there) I’m pressing the button but it tells me there are no grease strokes. Can you even give me a clue as to what I might be doing wrong (it’s the latest Blender, and the interface is a bit different but operates exactly the same). Here are my screen shots if that helps:
I did bad job in video explaining button next to ‘Particle hair from GP’. The button next to it is forcing operator to use SCENE GP data. You have to disable it, if you want to use OBJECT Grease Pencil data. So if you paint GP strokes on Scene, then enable buttot next to ‘Particle hair from GP’.
Thanks so much — that explains a lot. I’m finally making good progress (now if I can only wrap my head around the UV stuff I think I’ll be there). It’s an AMAZING tool, and one I think most all iClone owners will want to have (and I’ll promote it there once I finally get some hair out to show them).
Okay, just in case it was the Sensei interface I was using I went back and used a clean install of Blender and now I get errors when I try and convert. Here’s the screen:
Sorry to be a PITA but I so much want this to work as I think it would solve a ton of problems for hundreds of iClone users (most of whom would buy your plugin). I *promise* you I will sing its praises if I ever get this stuff figured out.
Hey Mike! I am getting a similar error in the latest version of the plugin. I completely agree with you about iCloners though. This tool is going to revolutionise hair creation for CC characters and I think it result in loads and loads of sales for Bartosz.
I don’t know much about IColone, but if it can import obj/fbx files, I see no problem importing custom hair there.
I’m going to make a video tutorial on using this to create actual hair to use in both Character Creator and iClone soon (well, as soon as I can get some hair done — still working on managing things).
Did you get it working? Right now I’m having a problem (specific to iClone so I don’t want Bartok to even think about it) in importing the hair from Blender to CC. I’m following the procedure I’ve always followed and yet it doesn’t work. Would love to know if you’re having luck or not.
I bought this add-on and it’s fantastic. I’m working on my first character model, only done hard surface stuff prior. I’m trying to figure out how your hair doesn’t render too thin with only one layer. I am rendering in Marmoset not blender, using the hair texture as alpha but even with 2 or 3 layers of hair I can see through to the scalp. Do you have any advice regarding material?
Watch first minut of this video, then skip to 11th minute: https://vimeo.com/228873075. Basically you need 2 textures density, one thick to cover head one less dense on top, to add softness. Also painting skin under the hair in dark color helps.
This add-on is full of bugs … 😦
//Este complemento esta lleno de bugs… 😦
A different bugs every time I use it. As long as the align tool does not work, it only destroys the orientation of the curves.
//Un bugs diferente cada ves que lo uso.ademas la herramienta alinear no sirve, solo destruye la orientación de las curvas.
Ok but what is the problem? Did you imported fibermesh to blender, converted it to curves – and the used ‘Particle hair from curve’ operator? Here is gif with steps for importing zbrush fibermesh.
Hey, I’ve been playing around with the Addon for a bit. From what I gather it’s not possible to display textures on the curve ribbons in the viewport right now. Is this something that you intend to make available at some point?
It certainly would be worth lobbying the developers for it, texture coordinates on curve profiles can come in handy and is something 3ds max can do out of the box, for example.
In the meantime I wonder if it would be possible to do it in another fashion by deforming uv-ed geometry along the curves instead of relying on blender’s built-in functionality to create these profiles?
It seems to be the missing element in your tool, to have that kind of texture preview at all times, making it possible to stay with curves for as long as possible and benefit from the great control they give over hair strand alignment and resolution and only converting to polygons for the optimization phase.
That should make it possible to transfer hairstyles between different heads as well with relative ease.
Here is blend file with setup that has mesh ribbon being instances on blender particle hairs: https://www.dropbox.com/s/esb2kuu74jnu9e7/StrandsUv.blend?dl=0
But you will see there are limitations to this method. On second layer there is curve deform example – by default blender creates only one ribbon, and it skips next two curves. So both of those methods are no good.
Some more thoughts on this – how about having this curve -> mesh ribbon conversion step initially and from then on using the curves to drive the (textured) mesh ribbons? No need to convert back/forth any further unless you wanted to e.g. change number of curve control points or ribbon resolution.
Or is there something that could be done with a modifier that converts the curves on the fly to mesh to be displayed in a cycles render viewport?
re: Modifier. Putting a Subsurf into the stack gives alpha masked texture preview in a viewport set to ‘Material’ while retaining curve controls. Downside seems to be that the texture needs to conform to the generated strip, no problem in my case but not exactly ideal since it means you cannot uv anything yourself.
Looks like it’ll be good enough for me in the meantime though.
Would this modifier -> geo method generally seem like an avenue to explore?
Well that was interesting – subsurf makes texture visible, but then again blender api doesn’t allow to change curves uv’s (no way to rotate them – there is scale and offset, but doesn’t seems to work).
I’ve gotten pretty far in understanding how to make this work, but for the life of me I can’t get a crucial step to function the way it does in all your examples. I just CANNOT get the curves or ribbons (I always get confused as to which I need to do first, but doing either one still doesn’t work) to align with the surface. As a result, the hair looks terrible — the curves are standing up parallel to the surface, at exactly the wrong angle when I press the “align curves” button.
Wait a minute — just for fun I tried doing the “Align curve tilt” while in EDIT mode (before I had been in object mode) and it seemed to work (at least it looks better). Is that what I have to do? Was I missing a critical step?
Link to dropbox dosen’t work, but it sound like scale on you curve ribbons is not applied. This is known issue, but there in no way around it except applying scale co curve ribbons. Then aligning shoould work ok. Also make sure there is no negative scale, on your snap target obj.
Sorry, I deleted the file when it looked like it was something I had done wrong. But help a complete novice out here — “scale on my curve ribbons”? What the heck is that? How do I apply it? All I did was take some grease pencils applied to the surface of my object (which is a scalp mesh), apply your “create particle hair” with children, and then turn them into those curves, which I then tried to align. I thought I was following what you were doing in your tutorial exactly but is there some step I missed?
Ooo, maybe I figured it out myself — there was a negative 0 rotation on the object (it came from somewhere else, so not my fault :>). When I just typed in 0 on that rotation things *seem* to work much better (there is just so much I don’t understand and never will about Blender, but I LOVE your plugin so it’s worth struggling with trying to understand how to use it).
All I am doing, with the object selected, is choosing “Ribbons from Children” and then pressing the Align Curve tilt button. (Or I can press F6 and choose that checkbox). Either way, the ribbons do NOT align, or even get close. If I do to edit mode, and select all of them, and then choose Align, they seem to align better (not great, but much better).
Ooo, maybe I figured it out myself — there was a negative 0 rotation on the object (it came from somewhere else, so not my fault :>). When I just typed in 0 on that rotation things *seem* to work much better (there is just so much I don’t understand and never will about Blender, but I LOVE your plugin so it’s worth struggling with trying to understand how to use it). (I wrote this above but just in case I don’t want you to have to spend more time helping me if this was all this was to it — the scalp object comes from iClone, and so this “problem” will be one that ALL iClone users will face trying to use your plugin. So it’s worth getting is solved).
Ok. I see – just select the mesh with particle hair – and hit ctrl+a -> ‘rotation & scale’. Then aligning will work (except bottom part because there is no geometry to snap too- to fix it just change snap target to original character mesh – then aligning should work even on bottom of hair). http://prntscr.com/h8ebpk. I will see if there is workaround, so there is no need for applying rot, loc, scale.
I can’t get it to show up in BLender to select after doing preferences, addons and install from file.
Can you check if addon is located in proper folder like in this image: http://prntscr.com/h9v1pv. It should be located in: C:\Users\BartoszStyperek\AppData\Roaming\Blender Foundation\Blender\2.79\scripts\addons
Hi again, after discovering the subsurf -> texture display trick i’ve been all over your addon for the last week. Not crashed once either. 🙂
Just wondering if there’s a way to have an inverse taper on the strands? To widen just a section of a strand?
Also, do we know of a way in Blender to reduce the hair mesh output while preserving quads? Maya has a poly reduce function that works well for this, you just set the desired poly count and off it goes. Most tools I know however collapse everything down to triangles, not so great for these hairstrips.
Hi. About optimizing curve try parameter ‘Preview U’ in curve settings: https://blender.stackexchange.com/questions/22940/how-can-i-make-a-curve-higher-resolution
Also you may use Curve Resample to force less amount of points for shorter strands: https://youtu.be/FLHbzCXOijg
About inverting taper – there is something like that on TODO. For now, when you are in curve edit mode, you can go to: select menu -> ‘select tips’, and then with soft selection you can shrink curve radius with alt+s.
This list is mosty for me from user request, not sure if you will understand:
#TODO: add custom clumping maybe?
#TODO: ribbon profile curve if possible
#TODO: can you add button similar to “Smooth tilt” but with “Smooth scale”
#TODO: adding ability to shrink beginnings of curve profiles, same as the endings
#TODO: Edit Curve profile option – more complex profile like ” /\/\/\ ” <- 3 peaks per one curve
#TODO: way to have the middle of the ribbon/curve raise up will still leaving both ends in place
I cannot praise this plugin enough — you have done wonders with the concept and made it possible for even knuckleheaded folks like me to make hair. If I had ONE wish, though, I wish there was a way to have the middle of the ribbon/curve raise up will still leaving both ends in place.
Your peak and offset routines offset the entire ribbon and it’s difficult (sometimes impossible) to select both ends of all the strands. What I’m doing is this — I use grease pencil because I need the hair to conform tightly, but I also need to build up layers. I’ve tried using particle hair, but it’s just too hard to get to completely conform on the ends as it needs to do for men’s hair styles. Grease pencil works great, but then I need to build up layers by putting grease pencil strokes on top of existing curves, and it would be fantastic if there were just a way to have the ends anchor and the middle raise up.
But thanks again for this tool – you should be rewarded by everyone (and once I get some workflow towards building my hair layers I’ll put together a tutorial for iClone users that should drive some traffic this way.
I think you want to align curve ribbon peak with actual curve right? The way to do this is – if you set ‘strand peak’ to 0.4, then set ‘Strand uplift’ to -0.40 – then the peak on curve will be exactly aligned to curve point. Also search for ‘Select Tips/Roots ‘ on this site – for gif with animation of how you can select hair roots/tips in curve edit mode.
About anchoring hair ends – u mean embedding hair roots into skull? There is ’embed roots’ option when converting particle hair into hair curve ribbons. Also this fragment of you-tube video may help: https://youtu.be/WE0aBe8SNls?t=867
What I’m trying to do is not embed roots, but embed tips. If I could do this I could then lift the strands with the peak or uplift (or both — can’t remember which one) and both ends would stay in the skull, which is needed for men’s hair (I can show you an image if you don’t visualize it). Selecting the tips in curve edit *might* work, but in general I have found that editing is tough because the surface is curved so tough to get the ends back into the skull properly.
Let me note that I need to do both — I want to embed the roots, but I already can do that. I’d just like some auto option to do the same for the tips. If I could do both I could still loft the hair in the middle out as you need to do with men (because men’s short hair stays close to the skull). The way you do short hair in your last demo works only if the hair is cut short all the way around, but most men don’t wear their hair that way. They have longer strands, but that hair still closely hugs the skull (again, I’d be glad to show you images but I suspect you know what I mean).
Images would help (I’m still not sure why tips of hair would go inside skull..). How about drawing longer hairs with Grease strokes, and then converting them to curves with low offset value – to make in close to skull? I did something like that at work, worked ok (cannot show due to NDA).
Sorry for late reply, new update is almost ready.
That’s okay, keep working on the program adding new stuff . The problem with the tips (ends) is if you have hair hanging down (which a man does have, but it stays close to his scalp) and then you want to add another layer, the easiest thing to do is to just use that offset value and raise them up — and you can keep the ends in the skull (with embed roots) but then the tips raise up as well (so it looks like a gal). I’d rather just bow the middle outward to add volume. But I’ll show you later what I mean — I’ll be working on some hair tomorrow and I’m going to try the tip selection you have and see if I can bend the tips back down to the skull and get the same effect.
I have sent you email with embed tips option. Let me know if it is what you were looking for.
Hey hey. I bought this addon not too long ago, but only get the option “Curves from Grid Surface” and nothing else, when wanting to create hair. Even so, I always get an error, no matter if I mark sharp edges right and what not. Any idea why that happens? ._.
The tools in Hair tool are context based, meaning if you paint some grease pencils strokes, then HairTool menu will show some buttons related to grease pencil, if you select object with blenders particle hairs, then new button will be displayed related to it. As for “Curves from Grid Surface” – it works only if mesh is made from quads, and you have to select border edge loop (whole border loop – not just few edges) as sharp. Maybe if future I will make it so, that whole loop doesn’t have to be selected.
I have a disappearing mesh problem when using the Draw UV option. I think that happens when I merge several different generated mesh ribbons together into one object and then try to use Draw UV’s later. Splitting them back as they were originally doesn’t help with the problem. Is there a way to prevent the disappearance or do I have to generate the meshes all over again?
the proper way of joining hairs would be to do this in curve ribbons mode, and then convert them to mesh ribbons. If you joined ribbons while being in mesh state, then you wont be able to go back properly into curve mode (curve ribbons are source of mesh ribbons, so any edits in mesh mode wont propagate to curve ribbons). The uv operation should work even if you merged hairs in mesh state, it is using second uv channel for that – so if your second uv channel was messed up, they may be error with generating proper uv’s. I would have to see the blend file to see what happened, but in general you want to do your edits in curve mode, and then make finl tweaks in mesh mode, when you are sure you wont have to go back into curve mode
Sigh — I’m sure I’m doing something wrong now, but with the latest version (which I have *just* tried using) I can’t get it to work at all properly. I’ll go back a version to be sure, but my normal workflow is to create grease pencil strokes, turn them into curves, and then generate the mesh. With this version, I can create the curves but there is no option then to convert to mesh. There is an “add ribbons” option, but it just creates a mess, with the ribbons flying off into space and not following the curves at all (they are actually perpendicular to the curves). Maybe I was dreaming, maybe I did the “add ribbons” function before and it worked properly, but in any case it doesn’t work for me now. Any ideas? (I can send you a file and/or video to show what’s going on).
For curves – there is option – ‘Add ribbons’ – this will add ribbon profile to ribbons, and only after that the option to conver to mesh will popup in menu “Curve Ribbons to mesh ribbons’ (there is no option to convert non ribbon curves to mesh). Also if you have mess with ribbons being not aligned to surface try to apply curves rotation and scale – this should fix aligning of curve ribbons to target surface. AFAIK that is the only way to make ribbons align to surface. Also if target mesh, that you are trying to align to, is complex, it is sometimes helpful to replace it with something simpler (eg sphere) and then set this sphere as target for ‘Align curve tilt’ operator. For complicated areas like near ears, the aligning may fail, that is why I suggest to replace it with sphere.
Never could get the new version to work, so I’m using the one version back, but in the meantime I created a tutorial for iClone users that explains how to uses your tool with it. I thought I’d post the link here in case you want to share it yourself (I know already a couple of folks have bought the tool because of me doing this tutorial — hopefully it will help others).
Nice. I will soon release new update which will give users ability to preview textures on curves, no there will be no need to jump to mesh ribbons. Hopefully it will work for you (if not just send me bug report with info from console) Btw. when you want to hide grease pencil – you can use Xray button to hide them, if they are behind object https://blender.stackexchange.com/questions/35296/how-to-draw-grease-pencil-on-a-surface-blender-2-75/35311.
Ah — didn’t know about the XRay button. Will try it. But I’ve already reported the latest version won’t work for me (not for the workflow noted in that video tutorial I made). When I change the curves to ribbons the ribbons fly all over the place, but in the previous version they do not (no difference in what I’m doing, but big difference between versions). So as a result I can’t update to the very latest version nor will I most likely be able to use any new updates from this point forward.
I couldn’t use versions 1.7 and 1.7.1 same as you (traceback errors), but I tried reverting back to a version that worked (1.6.5 in my case) and installed the subsequent newer versions one by one through “Install from File…”. So far I haven’t gotten any more traceback errors and I’m using 1.7.1. Did you try this method?
This is an amazing addon, but the most important part about it, is the great support and updates
Thanks Bartosz!
Dear Bartosz,
do you think there’s a benefit to creating and using normal maps in the hair shader?
In your hair texture tutorial you only make the alphas, you don’t make normal maps from them.
When I generate ribbons, Blender presents an error report saying there are various issues:
curve_to_strip.py in lines 246, 283, 184, and 131
(How do I post an image here?)
I have only just started using Hair Tool and so I believe I have made some simple error … I would be very grateful to receive your advice.
Can you send me blend file? Images cannot be attached -just post link to it. Btw. there was small bug in versin 1.7.1, I updated quite fast but buggy version was on gumroad for like 15 minutes. If you were unlucky and downloaded Hair Tool buggy version, try maybe downloading it again. Version number will be the same, but with bug fix – it may help you solve you problem.
Here is a different error report when I convert ribbons to mesh:
The Hair Tool seems to be functioning regardless of these error messages – but I don’t know why these reports are being generated.
Update 1.7.2 should fix your problems. Since 1.7 release HairTool has ability to view textures in curve ribbons mode – but it works only in cycles. So error was caused by runing HairTool in BInternal render – see new wideo about that update https://www.youtube.com/watch?v=gtbhmYEKGZE. In update 1.7.2 addon will switch automatically to cycles. To see materials with proper uv’s, on you curves use – ‘Curve ribbons UV Refresh ‘.
How do you delete UV boxes in 1.7.2? Pressing DEL (both times with Num Lock on and off) after selecting the corner of a box doesn’t work. I believe the “Rest UV” (Reset UV?) command doesn’t function either.
Well if you have Mesh Ribbons, you can convert them back to Curve Ribbons with ‘Mesh ribbons to Curve ribbons button’. After that select those curve hairs, and shift + select object that will receive the particle hair and use ‘Particle hair From Curves’. Then you object will have new Particle hair system created, from curve ribbons. In new release you will be able to interactively comb Particle Hair with preview of Hair ribbons like in this gif: https://twitter.com/JoseConseco3/status/962060531002572800
Reblogged this on 3DCineTV and commented:
Oh my!! I´m definetly getting this! There are some Maya people who really want to come over to Blender, and you´ve just solved one of their fears: BLENDER DOES have POWERFUL HAIR tools! Thanks!
There is blend file on gumroad with free alpha hair texture (painted in Paintstrom Studio). When texture baking for hair will be fully finished I will try to make something for free (but by that point creating hair textures will be so easy that people will be able to make some by them self very fast 🙂 )
Hello,
finaly i was able to try out hair tool 1.8.6 with Blender 2.79b but all i got was an error like Stuard before, just my error lines are 418, 427 and 248. Unfortunateley i have no means to post a screen. However, Blender is set to cycles render. I will try tonight on my other pc if it works there.
Besides i am not able to report a bug via that discort portal, since its not opebning at all!
Best regards,
Heiner Stiller
I am really a bit anoyed now: Where can I report a bug, which renders the product useless To me? Here it seems not to work neiter loged in nor not loged in! Thats my third try to do so: I am getting with V1.8.2 the same errors like Stuart before, exept mine are in lines 418, 427 and 248. I am on Win 10, Blender 2.79 a and Cycles is activated!
Sort of with a wrinkled forehead,
Bildermensch
Sorry to hear that. Maybe this link to discord will work for you: https://discord.gg/uqVsPd. Without image it’s impossible to say what is wrong. You can try linking to image uploaded to eg. here: https://imgur.com/upload. Also get latest hair tool 1.8.9, blender from official website. And try restarting blender after enabling addon, and saving user preferences. Those are just general suggestions, without image I can’t help more.
Well from what I know it may be problem with paypal on gumroad – it happens from time to time – it that case it is matter of waiting some time until it ‘fixes itself’ (maybe wait 1 day). Or it may be problem with browser – try firerfox. I do not sell it in other places. Or contanct me throught this page contact form, and I will give you other payment option.
Hello Bartos,
I am now getting somewhere with your plugin: I have still way to go untill i understand all but untill then, maybe i can make a suggestion: Maybe you can set up a “workspace” with all hair tools arranged for easy acess and add it as an almost empty bend file to the add on. I found out that most of my troubles are caused, because i dont know where to look for the elements to contol hair tool. Just an idea which might the whole process more easy to access for newcomes and me 😉
Aside from that, I am exited!
Bildermensch
Well all the buttons for hair tool are accessible from ctrl+shift+h hotkey, or from the left tools panel. I feel there is no enough buttons in Hair Tool to make new workspace (btw. blender 2.7 series dosen’t support thing like workspace, but 2.8 will). The only blend file right now that comes with Hair Tool is the one for baking – acessible from left Tools panel -> Hair Baking -> open baking scene.
I replied it in your youtube comment but just for others: I think you may use latest daily blender builds, and it is breaking blender undo somehow. Try going into preferences -> Editing -> Enable ‘Global Undo’. Save preferences and restart blender. Hope it works :).
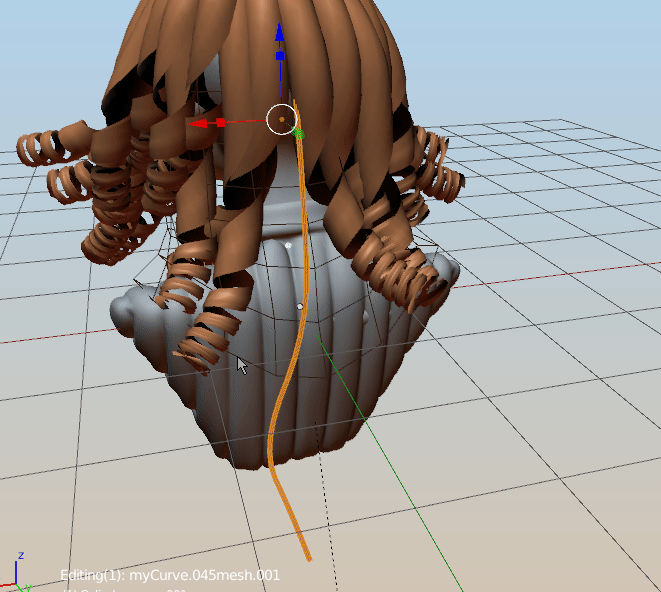
Well yes. Check this part of editing curve profile: https://youtu.be/iXjBCxesA_I?t=138 . With this and taper operator, you can create cone like hair strands. And then you can use interactive combing to define the hair style. And after that just convert to mesh with HT convert tool.
So I installed this on my new machine but the UV Hair plugin isn’t there — is this a separate install or am I missing something obvious? I can create hair just fine, but I can’t UV map it.
Ah, nevermind – I was an idiot. I did install and use it yesterday, but forgot to save user settings (so it wasn’t enabled again). But… here’s a question — I could have sworn the last time I used this (over a year ago, I think) you applied the UV to the mesh object and not to the ribbons, but now it says it only works on ribbons. Did something change or am I just being an old idiot again?
Well yes, the new worklow is that you do the uv in curve mode. Now you can preview texture on hair in curve mode, and this is less desctructive workflow compared to previous way. Here I explain the change: https://www.youtube.com/watch?v=gtbhmYEKGZE
I must be stupid. Bought your add on and wanted to update the latest version with the link you emailed me but cant get it to work.
Please help me out, where can I find how to install latest version?
thanks,
Hi. yes, managed to install it, but can not seem to get the latest version installed into Blender. still have 1.8.9 version and can’t seem to figure out how to (WHAT) to install the later version. Probably a stupid version: do i need to REMOVE the old version in Blender user preferences first , and if yes, WHAT do I do after I done that? which file should i try to install?
thanks.
No there is not need to reset preferences. If you have old version installed you may use this button to get rid of old verrison: http://prntscr.com/kq46f4 Then just follow video below:
Addon should be online again tomorrow, or 8th of september. But I think I will be forced to move to another selling platform (basically same as gumraod, but they give me no trouble if I have UK company and Polish residency).
Maybe you saved the zip file to your AppData\Roaming\Blender Foundation\Blender\2.79 ? Then blender will have problem with installing it complaining that zip file should be outside of addons folder. To fix just move zip file to eg. desktop and install it from there. Or second way: just manually extract zip file to: C:\Users\YourUserName\AppData\Roaming\Blender Foundation\Blender\2.79\scripts\addons\hair_tool
I can’t replicate this bug (latest daily build). Can you try removing :
C:\Users\_YourUserName_\AppData\Roaming\Blender Foundation\Blender\2.80\scripts\addons\hair_tool
Restart blender, and install again?
I did this of course, removed directory. Installed via addon manager and copied manualy, still errors. There’s screenshot, this morning B3d build http://prntscr.com/mdnmzd
Ok, there seems to be conflict maybe with other addon. Last line says that there is already registered ‘CUSTOM_NODES’ class. The only thing I can suggest is disabling other addons, that may be modifying blender nodes. I will change ‘CUSTOM_NODES’ name to something else, in next update, so hopefully this conflict wont happen in future.
Thank you!
Hi. I think I’m going to purchase the add-on. I’ve been following you and I find useful for some of my projects now and it’s good you bring it to 2.80. Do you include some demo files with it? I guess it could be useful.
Thanks
Yes, there is example blend file, but it is for old blender 2.79. I contains character with some chairs, example of grid meshes, that were used to generate curve hair ribbons.
Thanks for your quick answer. Well, it could work. I’m going to create some antropomorphic characters with fur, you know. I was looking for some example like you posted recently. I think it was a dog or similar what you posted some days ago.
Hey there.
In Blender 2.8, there is no search box showing up when pressing spacebar in the uv editor, so I can’t access the operator… any way around this?
Cheers…
Never mind… found the solution. In 2.8 preferences, you need to enable search functionality when pressing spacebar, instead of having it play the timeline… all the best
I download 2.8 and the interface is all different. It used to show up on the left side with objects. Now I can’t find it.
In blender 2.8 left panels are gone. I moved HTool panel to right side.
Ah! I got it!
Hi Bartosz
And thank you for this amazing addon.
Is the anisotropic lighting only work when you draw your strands with “D”?
When you create strands from a grid i don’t see any lighting connected to my strands nor material.
Is it something you’re working on or do you have any advice to setup a nice lighting directly connected to the new created strands?
Personally, for my new personal short film project, i would like to be able to deal with the lighting of my hairs outside the overall lighting of the scene so if you have a tip i would really appreciate it.
Hi Cedric
The hair shader is custom made and the aniso speculra is fake – works only with special light created when you import build in hair material in Hair Tool. When you create curves from grid surface the material will be automatically added: http://prntscr.com/ogv4sg
About hair shader – if you are using Cycles there is option for anisotropic specular. And there is hair shader tool. https://docs.blender.org/manual/en/latest/render/cycles/nodes/types/shaders/hair_principled.html
Hello Bartos,
I am having a little trouble with the material. I am trying to do that interactive hair grooming example: I create sphere, I create hair system, set hairs to a nice length, reduce amount of hairs to 200. Then I switch to grooming, in in the N menu i open hair tool and create settings, activate the option “Interactive Curve Ribbons” and nothing … I can groom and all, but the hair material gets not created 😦
Render engine is set to eevee. What I am missing here?
Thanks for helping me out.
Cheers
Heiner
I can recreate this problem. Can you send the blend file? YOu can use discord for support: go to addon preferences -> hair tool -> report bug button. It will direct you to addond suppord discord channel.
The mesh hair ribbons are just ordinary mesh with UV’s. You can export it to any engine as obj or fbx. You can create textures using build in hair baking: https://joseconseco.github.io/HairToolDocs_28/texture_baking/ . Then you will have texture maps as png, images which can be exported to any engine. Just make sure your generated texures are matching mesh hair uv’s.
Hello!
I am coming back to use the Hair Tool after a really big time away from the tool and I saw that the addon have now a new function that creates the low poly hair by using particle hair in the model.
At this moment I am finishing a character for a game design project and I thought that this function would be perfect to make the beard and eyelashes of the character, but I need to know first:
Does this function follow the mesh rig/movement (like Blend Shape)?
If yes:
Can the model be exported to the engine with this function?
If not:
Do you know a way that I can take de Hair Tool to make the Low Poly hair following the character’s mesh?
Since now, thanks for your attention. 🙂
Cheers!
For transferring shape keys I developed this addon: https://gumroad.com/l/shape_transfer (you may try googling for some free addons for that, but not sure If any will work). As for rig deformation – you can weight paint hair cards like any other mesh. Best way would be using ‘data transfer modifier’ to transfer weights from head to hair. Then your hair can be exported to any game engine just like any other mesh
Thanks for the help, I’ll try it soon as I be able to buy the addon! 🙂
By the way, do you have a tutorial showing how it works? So I can understande better the tool befores buy it.
About the data transfer, thanks for the sugestion, I had never used the data transfer modifier, so I’ll search more about and give it a try! 🙂
I bought this product and when the blender upgraded I could not get it again and the creator not responding
Hi I bought your addon long time ago( version 1.92), I did not have gumroad acount, just bought it, no way for me to go back to gumroad. I cant update. how can I get help
You should have received email from gumroad with download link. There is no need to have gumroad account for this. Maybe if you cant find the email from gumroad, then you can give me your email address – and I will re-send the purchase email to you.
Unfortunately the email was from yahoo and now is gone due to yahoo new rules, I dont even have it now, was long time ago. Honestly I’m not even entirely sure that was the email. I guess the only option left for me to order it again.
Since I do not have way to verify your purchase, the best I can offer is to offer you discount for new version (50% ). Please contact me using: https://discord.gg/cxZDbqH
Hi bartoszstyperek,
Very grateful for your kindness, I’am very new to Discord, trying to understand how things works around there, but it says you don’t have permission to send messages in this channel , I can write
a message in test-channel and etc… if that is what you ment, or if you wish you can email me
as well.
regards


This is wonderful ! Definately gonna get this.
Any chance this Addon will come with a tutorial on one of these hair style ? Or maybe a library of hair texture to go with this addon ?
I was going to make tutorial this weekend, but coding new update took longer that expected (I can do one thing only at time 😀 ). There are many new goodies with 1.2 release. But I still plan making tutorial. For now I can say hair texture was hand painted with PaintStorm Studio. Great app!
I messed up the 1.2 file. I re-uploaded it again on gumroad – so when you get hair_tool_1.2.zip, and install it from blender->prefference> addons> install from file, it should work great. Sorry for inconvenience.
You’re a man of wonders, you know that ? Keep up the good work ! I’ll help you spread the news in Vietnam’s blender community.
First 2 videos are out (about shader, and about texture creation):https://vimeo.com/229043427, https://vimeo.com/228873075. Next will be about addon itself.
thanks a lot!
it would be great to have a tutorial of how the addon works
Hi! Just bought your addon, from the looks of it, it seems it may free me from the hell that is hair making!
Do you know how to recreate the anisotropic effect in internal? Or in something like shader forge for unity?
This seems like something much more useful for realtime game ready characters rather them cycles renders.
Some people seem to bake normals from a smooth shape like a sphere to strangers hair, will this be needed with your addon?
There seems to be ‘Tangent shading’ checkbox in BI, so It should be possible to make similar shader there. About shaders for unity – well I don’t know it, but all moder game engines are supporting stuff like anisotropic materials through some tricks. I know in unreal there is demo scene with hair shader that you can modify to your needs. But it is bit complicated to understand the node setup. We have technical guy for that 🙂
About baking normals from one mesh to another it is already posible in blender just use Data transfer modifier. – firs image has the setup for what you need. I takes 5 clicks to setup.
Um I know I may sound a little stupid, but how do you mark sharps? what do you use to do that? Is it the same as marking seams? Is there a different place I have to go? you don’t say anywhere what a sharp is or how to make one.
Just select one border loop, and use > ctrl+E -> mark sharp. It has to be border edge, on grid type of mesh.
Thank you so much ^^
Do you have more example renders of hair models?
Just few more of the ones I made while developing addon. But I didn’t spent too much time on them:
I can give refunds, so If you want, you can try it, and return it back.
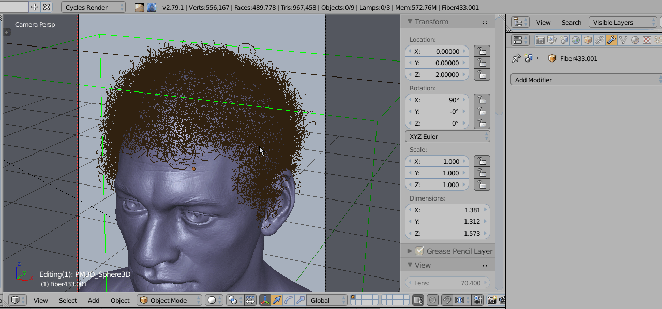
looks very useful…how does one construct very tight curly hair, for example, african american types?
I was doing exactly this today at work. I think using particles and instance many random 2d bilboards with it, is way to go. I will be testing this approach tomorrow.
how did you testing for tight curly hair turn out?
I won’t be able to show this in public, but the basic workflow was: make shpere, make plane – use poke tool on it, and push vert in the center slightly inside. Then scatter this plane on shpere using particles. And for curly hair texture I used zbrush fibermesh, buy you can use blender hair particles with child curls to get something like http://prntscr.com/gbc1qt
I love this so far!!!! this is amazing. I think the one thing I wish it did was add the noise values to the hair ribbons generated by particle strands.
Oh and when I created a second hair “clump” with this, it tells me the first mesh cannot be a shared user group and to remove the user group. I think this is easily solved by me changing the name of the hair clump.
Seriously though, thank you for this addon. I’m looking forward to more updates and I heavily support it through the community ❤
The thing about adding noise to blender particle hair is, that blender already has build in noise features in particle child strands. It is explained here – https://youtu.be/EVj1fETtuN8?t=565. About second hair clump – it is a feature not an bug. It lets you preview particle hairs as ribbons, and if you don’t like it, just tweak hair particles, and generate them again – old ribbons will be automatically updated. And as you discovered, if you want new ribbons, just rename (or duplicate) old one.
Im new to blender and i have purchased your tool, Looks wonderful but how to install this add-on ?
Installed…you don´t know how much i am enjoying this tool. Made my life a lot better 🙂
Soorry for late reply. I’m glad you like it. I hope I will finish video about how to use Hair tool today 🙂
This is an amazing addon, I’m waiting for some video tutorials on how to use it, then I’m 100% sure I’ll buy it.
Great addon! Nice colours in your themes. So could you share your theme with us? Thanks!
Sure, here you go: bscustomgray07.xml
Just purchased this. A tutorial would be awesome!
Cześć, właśnie kupiłam twój addon. Niestety mam problem ze skrótem F6… a konkretnie, po wciśnięciu opcji add ribbon to curves skrót F6 działa tylko raz… jeśli sobie kliknę w międzyczasie gdziekolwiek indziej to ten skrót przestaje działać… Z resztą przy tworzeniu krzywych także zdarza się że nie działa i muszę restartować blendera. Tak chyba nie powinno być? Używam wersji 2.78
Cześć, właściwie to chyba nie jest bug. Włączając dowolny operator w blenderze można uzyskać dostęp do jego opcji przez f6, ale tylko bezpośrednio po użyciu danej funkcji. Mam juz na liście rzeczy dodo, dodanie zapamiętywania opcji danego operatora. Na razie może można zmienić szerokość ribbona przez zmianę promienia krzywej (alt+s), a liczbę podziałów w poprzek możesz zmienić we panelu właściwości krzywych – parametr ‘Preview U’. Czy coś takiego wystarcza? I jeszcze jedno addon ma błędy w wersji blendera poniżej 2.78c. Więc zalecam aktualizację do wersji 2.78c
Dzięki za odpowiedź, już trochę się z tym oswoiłam. 😉 Dziękuję również za przydatny skrót, to bardzo ułatwia sprawę! Naprawdę świetny addon, fajna alternatywa dla wiecznie crashującej Majki. 😉
Hi amazing plugin. I just have one questions. How can I use fibermesh with this plugin. I exported the curves from zbrush as obj and imported into blender but I dont know how to convert it to curves.
Yes, it is possible in 1.4 release. Steps are:
– join imported fibermesh obj, with ‘alt+j’ command
– then convert this merged object to curves – with ‘alt+c’ – Curves from mehs
– finnally select curves, then head object – and attach those curves with ‘Particle hair from curves’ option in Hair Tool panel.
Just to make sure I understood this right (now that I bought it already.. — damn I should have read this here before!): It’s NOT possible, to get particle hairs from a pre-existing mesh with this addon? Aka: make particle hair from curves that we created after a mesh there? o.o
There is option – ‘Particle hair from curve’ but thing is, if curves were crated from mesh object – the direction of those curves may go in different directions. You would have to unify curves direction before converting them to Particle hair.
Hi, question how are you did customized pie menu?(On this moment – https://youtu.be/WE0aBe8SNls?t=59 ) and how are you did this opened window? When you press button open window settings of hair(on this moment – https://youtu.be/WE0aBe8SNls?t=104 ) I hope you understand 🙂
Custom pies were created using this Pie Menu Editor – great addon. About properties popup – they can be opened using F6 button. This is standard blender behavior when executing any operation – not just when using Hair Tool.
How the heck do you install this? I bought version 1.4 but haven’t had the time yet to get around to testing it out (so now I was sent 1.5). I tried copying all the python scripts into Scripts/Addon but that didn’t work. Then I tried “Install from File” for each one but no luck there, either. I’m using the latest Blender and I can’t see this tool anywhere (I had Sensei activated, but even turning it off and going through the above doesn’t help).
The file structure should be like this: http://prntscr.com/gpudsx
So all your ‘Hair Tool’ files should be inside this folder: C:\Users\YourUserName\AppData\Roaming\Blender Foundation\Blender\2.79\scripts\addons\hair_tool
I it should work with both 2.79 and 2.78c. I’m not sure about sensei format – but can you try default bledner build from blender.org?
Even on a brand new installation of Blender, with my stuff in the same directory as yours (although I don’t have ALL those python scripts — I only have six of them and only six came with 1.4 as well so I’m not sure where you are getting the rest) this doesn’t work. The hair tool doesn’t show up in Tools nor does it show in Modifiers — so I’m lost.
Okay, I’m an idiot (well, at the very least, a Blender newbee). I keep looking for the tool by alphabetical order (so Hair Tool) instead of under the Catergory:Order it is in addons. So I found it and activated it and at least have it showing. You can ignore my problems for now (sorry).
None of your Vimeo videos are showing for me — I click on them and it just takes me to the base page asking if I want to join Vimeo.
That is weird, maybe try cleaning cookies or different browser? I tried opening links in both opera and firefox and both worked ok. Or manually copy link, and paste in new tab… I have no other ideas.
It’s coming up that way in all my browsers — I suspect YOU don’t see it because you have a paid Vimeo account (or perhaps your Vimeo account is just logging you in automatically). Also, there is something odd about that link — try coping it and pasting it into Notepad and you’ll see. WordPress does an auto re-direct. However, I *was* able to get to that video by just manually typing in the link (so not by clicking or copying). Just a headsup as there may be many who can’t see your videos.
I SO desperately want to be able to use this — and I feel like an idiot. I’m following along your new tutorial, drawing grease pencil strokes (on an object) and then, with object selected (and no scene in there) I’m pressing the button but it tells me there are no grease strokes. Can you even give me a clue as to what I might be doing wrong (it’s the latest Blender, and the interface is a bit different but operates exactly the same). Here are my screen shots if that helps:
https:https://www.dropbox.com/s/js0jlqcrph4fp7j/End01.jpg?dl=0//www.dropbox.com/s/5oevpwgntkvh7so/Next01.jpg?dl=0
I did bad job in video explaining button next to ‘Particle hair from GP’. The button next to it is forcing operator to use SCENE GP data. You have to disable it, if you want to use OBJECT Grease Pencil data. So if you paint GP strokes on Scene, then enable buttot next to ‘Particle hair from GP’.
Thanks so much — that explains a lot. I’m finally making good progress (now if I can only wrap my head around the UV stuff I think I’ll be there). It’s an AMAZING tool, and one I think most all iClone owners will want to have (and I’ll promote it there once I finally get some hair out to show them).
Okay, just in case it was the Sensei interface I was using I went back and used a clean install of Blender and now I get errors when I try and convert. Here’s the screen:
Sorry to be a PITA but I so much want this to work as I think it would solve a ton of problems for hundreds of iClone users (most of whom would buy your plugin). I *promise* you I will sing its praises if I ever get this stuff figured out.
Hey Mike! I am getting a similar error in the latest version of the plugin. I completely agree with you about iCloners though. This tool is going to revolutionise hair creation for CC characters and I think it result in loads and loads of sales for Bartosz.
See this comment for answer: https://bartoszstyperek.wordpress.com/2017/07/29/hair-tool-blender-addon/#comment-1005. I will update manula make it more clear about when using GP scene stroke, and when GP object.
Hi,
Tutorial Export to Iclone please.
I don’t know much about IColone, but if it can import obj/fbx files, I see no problem importing custom hair there.
I’m going to make a video tutorial on using this to create actual hair to use in both Character Creator and iClone soon (well, as soon as I can get some hair done — still working on managing things).
Did you get it working? Right now I’m having a problem (specific to iClone so I don’t want Bartok to even think about it) in importing the hair from Blender to CC. I’m following the procedure I’ve always followed and yet it doesn’t work. Would love to know if you’re having luck or not.
I bought this add-on and it’s fantastic. I’m working on my first character model, only done hard surface stuff prior. I’m trying to figure out how your hair doesn’t render too thin with only one layer. I am rendering in Marmoset not blender, using the hair texture as alpha but even with 2 or 3 layers of hair I can see through to the scalp. Do you have any advice regarding material?
Watch first minut of this video, then skip to 11th minute: https://vimeo.com/228873075. Basically you need 2 textures density, one thick to cover head one less dense on top, to add softness. Also painting skin under the hair in dark color helps.
Ah that makes sense. Thank you so much.
This add-on is full of bugs … 😦

//Este complemento esta lleno de bugs… 😦
A different bugs every time I use it. As long as the align tool does not work, it only destroys the orientation of the curves.
//Un bugs diferente cada ves que lo uso.ademas la herramienta alinear no sirve, solo destruye la orientación de las curvas.
Can you send me the problematic file with steps to reproduce bug?
Great job! This is definitely a useful add-on!
Hi you have done a great work!! i am having problem with convert fibermesh curves on particle hair, we can help on this??
Ok but what is the problem? Did you imported fibermesh to blender, converted it to curves – and the used ‘Particle hair from curve’ operator?
Here is gif with steps for importing zbrush fibermesh.
I ended up hopping the convert part to curves, thanks for help!
Hey, I’ve been playing around with the Addon for a bit. From what I gather it’s not possible to display textures on the curve ribbons in the viewport right now. Is this something that you intend to make available at some point?
I with I could make it work. But currently, afaik it is impossible to do this via python. Maybe in blender 2.8? Who knows
It certainly would be worth lobbying the developers for it, texture coordinates on curve profiles can come in handy and is something 3ds max can do out of the box, for example.
In the meantime I wonder if it would be possible to do it in another fashion by deforming uv-ed geometry along the curves instead of relying on blender’s built-in functionality to create these profiles?
It seems to be the missing element in your tool, to have that kind of texture preview at all times, making it possible to stay with curves for as long as possible and benefit from the great control they give over hair strand alignment and resolution and only converting to polygons for the optimization phase.
That should make it possible to transfer hairstyles between different heads as well with relative ease.
Here is blend file with setup that has mesh ribbon being instances on blender particle hairs: https://www.dropbox.com/s/esb2kuu74jnu9e7/StrandsUv.blend?dl=0
But you will see there are limitations to this method. On second layer there is curve deform example – by default blender creates only one ribbon, and it skips next two curves. So both of those methods are no good.
Some more thoughts on this – how about having this curve -> mesh ribbon conversion step initially and from then on using the curves to drive the (textured) mesh ribbons? No need to convert back/forth any further unless you wanted to e.g. change number of curve control points or ribbon resolution.
Or is there something that could be done with a modifier that converts the curves on the fly to mesh to be displayed in a cycles render viewport?
re: Modifier. Putting a Subsurf into the stack gives alpha masked texture preview in a viewport set to ‘Material’ while retaining curve controls. Downside seems to be that the texture needs to conform to the generated strip, no problem in my case but not exactly ideal since it means you cannot uv anything yourself.
Looks like it’ll be good enough for me in the meantime though.
Would this modifier -> geo method generally seem like an avenue to explore?
Well that was interesting – subsurf makes texture visible, but then again blender api doesn’t allow to change curves uv’s (no way to rotate them – there is scale and offset, but doesn’t seems to work).
See me comment above. https://bartoszstyperek.wordpress.com/2017/07/29/hair-tool-blender-addon/#comment-1078
It kind-of works but only on particle hair.
I’ve gotten pretty far in understanding how to make this work, but for the life of me I can’t get a crucial step to function the way it does in all your examples. I just CANNOT get the curves or ribbons (I always get confused as to which I need to do first, but doing either one still doesn’t work) to align with the surface. As a result, the hair looks terrible — the curves are standing up parallel to the surface, at exactly the wrong angle when I press the “align curves” button.
Here’s a Dropbox link to my Blender file — if ANYONE can tell me what I’m doing wrong I’d love to know: https://www.dropbox.com/s/tso7azqpefvmsoi/MyHairFail.blend?dl=0
Wait a minute — just for fun I tried doing the “Align curve tilt” while in EDIT mode (before I had been in object mode) and it seemed to work (at least it looks better). Is that what I have to do? Was I missing a critical step?
Link to dropbox dosen’t work, but it sound like scale on you curve ribbons is not applied. This is known issue, but there in no way around it except applying scale co curve ribbons. Then aligning shoould work ok. Also make sure there is no negative scale, on your snap target obj.
Sorry, I deleted the file when it looked like it was something I had done wrong. But help a complete novice out here — “scale on my curve ribbons”? What the heck is that? How do I apply it? All I did was take some grease pencils applied to the surface of my object (which is a scalp mesh), apply your “create particle hair” with children, and then turn them into those curves, which I then tried to align. I thought I was following what you were doing in your tutorial exactly but is there some step I missed?
Ooo, maybe I figured it out myself — there was a negative 0 rotation on the object (it came from somewhere else, so not my fault :>). When I just typed in 0 on that rotation things *seem* to work much better (there is just so much I don’t understand and never will about Blender, but I LOVE your plugin so it’s worth struggling with trying to understand how to use it).
Well, there is more info about applying transformations in blender:https://docs.blender.org/manual/en/dev/editors/3dview/object/editing/transform/clear_apply.html
Basically all you have to do is: select curve ribbons -> press ‘ctrl+a’ -> select scale. It should fix your problem. At least this is what I assume is wrong. Without blend file it is hard to tell.
Okay, here’s the file that fails (any file, really, but this is just one sample): https://www.dropbox.com/s/bt4scjwb5h72jy7/MyHairFail.blend?dl=0
All I am doing, with the object selected, is choosing “Ribbons from Children” and then pressing the Align Curve tilt button. (Or I can press F6 and choose that checkbox). Either way, the ribbons do NOT align, or even get close. If I do to edit mode, and select all of them, and then choose Align, they seem to align better (not great, but much better).
Ooo, maybe I figured it out myself — there was a negative 0 rotation on the object (it came from somewhere else, so not my fault :>). When I just typed in 0 on that rotation things *seem* to work much better (there is just so much I don’t understand and never will about Blender, but I LOVE your plugin so it’s worth struggling with trying to understand how to use it). (I wrote this above but just in case I don’t want you to have to spend more time helping me if this was all this was to it — the scalp object comes from iClone, and so this “problem” will be one that ALL iClone users will face trying to use your plugin. So it’s worth getting is solved).
Ok. I see – just select the mesh with particle hair – and hit ctrl+a -> ‘rotation & scale’. Then aligning will work (except bottom part because there is no geometry to snap too- to fix it just change snap target to original character mesh – then aligning should work even on bottom of hair). http://prntscr.com/h8ebpk. I will see if there is workaround, so there is no need for applying rot, loc, scale.
I can’t get it to show up in BLender to select after doing preferences, addons and install from file.
Can you check if addon is located in proper folder like in this image: http://prntscr.com/h9v1pv. It should be located in: C:\Users\BartoszStyperek\AppData\Roaming\Blender Foundation\Blender\2.79\scripts\addons
Hi again, after discovering the subsurf -> texture display trick i’ve been all over your addon for the last week. Not crashed once either. 🙂
Just wondering if there’s a way to have an inverse taper on the strands? To widen just a section of a strand?
Also, do we know of a way in Blender to reduce the hair mesh output while preserving quads? Maya has a poly reduce function that works well for this, you just set the desired poly count and off it goes. Most tools I know however collapse everything down to triangles, not so great for these hairstrips.
Thanks for your work.
Hi. About optimizing curve try parameter ‘Preview U’ in curve settings: https://blender.stackexchange.com/questions/22940/how-can-i-make-a-curve-higher-resolution
Also you may use Curve Resample to force less amount of points for shorter strands: https://youtu.be/FLHbzCXOijg
About inverting taper – there is something like that on TODO. For now, when you are in curve edit mode, you can go to: select menu -> ‘select tips’, and then with soft selection you can shrink curve radius with alt+s.
Thanks, will give that a try!
Btw. is your Todo-List by any chance publicly viewable? 🙂
This list is mosty for me from user request, not sure if you will understand:
#TODO: add custom clumping maybe?
#TODO: ribbon profile curve if possible
#TODO: can you add button similar to “Smooth tilt” but with “Smooth scale”
#TODO: adding ability to shrink beginnings of curve profiles, same as the endings
#TODO: Edit Curve profile option – more complex profile like ” /\/\/\ ” <- 3 peaks per one curve
#TODO: way to have the middle of the ribbon/curve raise up will still leaving both ends in place
I cannot praise this plugin enough — you have done wonders with the concept and made it possible for even knuckleheaded folks like me to make hair. If I had ONE wish, though, I wish there was a way to have the middle of the ribbon/curve raise up will still leaving both ends in place.
Your peak and offset routines offset the entire ribbon and it’s difficult (sometimes impossible) to select both ends of all the strands. What I’m doing is this — I use grease pencil because I need the hair to conform tightly, but I also need to build up layers. I’ve tried using particle hair, but it’s just too hard to get to completely conform on the ends as it needs to do for men’s hair styles. Grease pencil works great, but then I need to build up layers by putting grease pencil strokes on top of existing curves, and it would be fantastic if there were just a way to have the ends anchor and the middle raise up.
But thanks again for this tool – you should be rewarded by everyone (and once I get some workflow towards building my hair layers I’ll put together a tutorial for iClone users that should drive some traffic this way.
I think you want to align curve ribbon peak with actual curve right? The way to do this is – if you set ‘strand peak’ to 0.4, then set ‘Strand uplift’ to -0.40 – then the peak on curve will be exactly aligned to curve point. Also search for ‘Select Tips/Roots ‘ on this site – for gif with animation of how you can select hair roots/tips in curve edit mode.
About anchoring hair ends – u mean embedding hair roots into skull? There is ’embed roots’ option when converting particle hair into hair curve ribbons. Also this fragment of you-tube video may help: https://youtu.be/WE0aBe8SNls?t=867
What I’m trying to do is not embed roots, but embed tips. If I could do this I could then lift the strands with the peak or uplift (or both — can’t remember which one) and both ends would stay in the skull, which is needed for men’s hair (I can show you an image if you don’t visualize it). Selecting the tips in curve edit *might* work, but in general I have found that editing is tough because the surface is curved so tough to get the ends back into the skull properly.
Let me note that I need to do both — I want to embed the roots, but I already can do that. I’d just like some auto option to do the same for the tips. If I could do both I could still loft the hair in the middle out as you need to do with men (because men’s short hair stays close to the skull). The way you do short hair in your last demo works only if the hair is cut short all the way around, but most men don’t wear their hair that way. They have longer strands, but that hair still closely hugs the skull (again, I’d be glad to show you images but I suspect you know what I mean).
Images would help (I’m still not sure why tips of hair would go inside skull..). How about drawing longer hairs with Grease strokes, and then converting them to curves with low offset value – to make in close to skull? I did something like that at work, worked ok (cannot show due to NDA).
Sorry for late reply, new update is almost ready.
That’s okay, keep working on the program adding new stuff . The problem with the tips (ends) is if you have hair hanging down (which a man does have, but it stays close to his scalp) and then you want to add another layer, the easiest thing to do is to just use that offset value and raise them up — and you can keep the ends in the skull (with embed roots) but then the tips raise up as well (so it looks like a gal). I’d rather just bow the middle outward to add volume. But I’ll show you later what I mean — I’ll be working on some hair tomorrow and I’m going to try the tip selection you have and see if I can bend the tips back down to the skull and get the same effect.
I have sent you email with embed tips option. Let me know if it is what you were looking for.
Hey hey. I bought this addon not too long ago, but only get the option “Curves from Grid Surface” and nothing else, when wanting to create hair. Even so, I always get an error, no matter if I mark sharp edges right and what not. Any idea why that happens? ._.
The tools in Hair tool are context based, meaning if you paint some grease pencils strokes, then HairTool menu will show some buttons related to grease pencil, if you select object with blenders particle hairs, then new button will be displayed related to it. As for “Curves from Grid Surface” – it works only if mesh is made from quads, and you have to select border edge loop (whole border loop – not just few edges) as sharp. Maybe if future I will make it so, that whole loop doesn’t have to be selected.
I have a disappearing mesh problem when using the Draw UV option. I think that happens when I merge several different generated mesh ribbons together into one object and then try to use Draw UV’s later. Splitting them back as they were originally doesn’t help with the problem. Is there a way to prevent the disappearance or do I have to generate the meshes all over again?
the proper way of joining hairs would be to do this in curve ribbons mode, and then convert them to mesh ribbons. If you joined ribbons while being in mesh state, then you wont be able to go back properly into curve mode (curve ribbons are source of mesh ribbons, so any edits in mesh mode wont propagate to curve ribbons). The uv operation should work even if you merged hairs in mesh state, it is using second uv channel for that – so if your second uv channel was messed up, they may be error with generating proper uv’s. I would have to see the blend file to see what happened, but in general you want to do your edits in curve mode, and then make finl tweaks in mesh mode, when you are sure you wont have to go back into curve mode
Sigh — I’m sure I’m doing something wrong now, but with the latest version (which I have *just* tried using) I can’t get it to work at all properly. I’ll go back a version to be sure, but my normal workflow is to create grease pencil strokes, turn them into curves, and then generate the mesh. With this version, I can create the curves but there is no option then to convert to mesh. There is an “add ribbons” option, but it just creates a mess, with the ribbons flying off into space and not following the curves at all (they are actually perpendicular to the curves). Maybe I was dreaming, maybe I did the “add ribbons” function before and it worked properly, but in any case it doesn’t work for me now. Any ideas? (I can send you a file and/or video to show what’s going on).
For curves – there is option – ‘Add ribbons’ – this will add ribbon profile to ribbons, and only after that the option to conver to mesh will popup in menu “Curve Ribbons to mesh ribbons’ (there is no option to convert non ribbon curves to mesh). Also if you have mess with ribbons being not aligned to surface try to apply curves rotation and scale – this should fix aligning of curve ribbons to target surface. AFAIK that is the only way to make ribbons align to surface. Also if target mesh, that you are trying to align to, is complex, it is sometimes helpful to replace it with something simpler (eg sphere) and then set this sphere as target for ‘Align curve tilt’ operator. For complicated areas like near ears, the aligning may fail, that is why I suggest to replace it with sphere.
Never could get the new version to work, so I’m using the one version back, but in the meantime I created a tutorial for iClone users that explains how to uses your tool with it. I thought I’d post the link here in case you want to share it yourself (I know already a couple of folks have bought the tool because of me doing this tutorial — hopefully it will help others).
Nice. I will soon release new update which will give users ability to preview textures on curves, no there will be no need to jump to mesh ribbons. Hopefully it will work for you (if not just send me bug report with info from console) Btw. when you want to hide grease pencil – you can use Xray button to hide them, if they are behind object https://blender.stackexchange.com/questions/35296/how-to-draw-grease-pencil-on-a-surface-blender-2-75/35311.
Ah — didn’t know about the XRay button. Will try it. But I’ve already reported the latest version won’t work for me (not for the workflow noted in that video tutorial I made). When I change the curves to ribbons the ribbons fly all over the place, but in the previous version they do not (no difference in what I’m doing, but big difference between versions). So as a result I can’t update to the very latest version nor will I most likely be able to use any new updates from this point forward.
I couldn’t use versions 1.7 and 1.7.1 same as you (traceback errors), but I tried reverting back to a version that worked (1.6.5 in my case) and installed the subsequent newer versions one by one through “Install from File…”. So far I haven’t gotten any more traceback errors and I’m using 1.7.1. Did you try this method?
This is an amazing addon, but the most important part about it, is the great support and updates
Thanks Bartosz!
Dear Bartosz,
do you think there’s a benefit to creating and using normal maps in the hair shader?
In your hair texture tutorial you only make the alphas, you don’t make normal maps from them.
When I generate ribbons, Blender presents an error report saying there are various issues:
curve_to_strip.py in lines 246, 283, 184, and 131
(How do I post an image here?)
I have only just started using Hair Tool and so I believe I have made some simple error … I would be very grateful to receive your advice.
Can you send me blend file? Images cannot be attached -just post link to it. Btw. there was small bug in versin 1.7.1, I updated quite fast but buggy version was on gumroad for like 15 minutes. If you were unlucky and downloaded Hair Tool buggy version, try maybe downloading it again. Version number will be the same, but with bug fix – it may help you solve you problem.
Thanks Bartosz.
I’ve re-downloaded 1.7.1 zip and installed. Created a new project a plane … and experienced the same problems.
Here is the blend file:
http://www.firesidesprites.com/hairtool/hairtool_problem.blend
Here is the error report when I generate ribbons:

Here is a different error report when I convert ribbons to mesh:

The Hair Tool seems to be functioning regardless of these error messages – but I don’t know why these reports are being generated.
Update 1.7.2 should fix your problems. Since 1.7 release HairTool has ability to view textures in curve ribbons mode – but it works only in cycles. So error was caused by runing HairTool in BInternal render – see new wideo about that update https://www.youtube.com/watch?v=gtbhmYEKGZE. In update 1.7.2 addon will switch automatically to cycles. To see materials with proper uv’s, on you curves use – ‘Curve ribbons UV Refresh ‘.
Excellent!
Thank you so much!!!
How do you delete UV boxes in 1.7.2? Pressing DEL (both times with Num Lock on and off) after selecting the corner of a box doesn’t work. I believe the “Rest UV” (Reset UV?) command doesn’t function either.
Nevermind, figured it out. The regular DEL key works, just not the Numpad one which I’ve been mostly using all this time. Must be a Blender thing.
can i mesh hair convert to Particle Hair?
Well if you have Mesh Ribbons, you can convert them back to Curve Ribbons with ‘Mesh ribbons to Curve ribbons button’. After that select those curve hairs, and shift + select object that will receive the particle hair and use ‘Particle hair From Curves’. Then you object will have new Particle hair system created, from curve ribbons. In new release you will be able to interactively comb Particle Hair with preview of Hair ribbons like in this gif: https://twitter.com/JoseConseco3/status/962060531002572800
Reblogged this on 3DCineTV and commented:
Oh my!! I´m definetly getting this! There are some Maya people who really want to come over to Blender, and you´ve just solved one of their fears: BLENDER DOES have POWERFUL HAIR tools! Thanks!
Congrats on this addon! It’s wonderful addition to my Blender workflow.
I have a request: If the demo download could include a handful of free to use Hair Alphas, it would add so much value to this addon.
Please let me know if we could have this. Thank you!
There is blend file on gumroad with free alpha hair texture (painted in Paintstrom Studio). When texture baking for hair will be fully finished I will try to make something for free (but by that point creating hair textures will be so easy that people will be able to make some by them self very fast 🙂 )
Hello,
finaly i was able to try out hair tool 1.8.6 with Blender 2.79b but all i got was an error like Stuard before, just my error lines are 418, 427 and 248. Unfortunateley i have no means to post a screen. However, Blender is set to cycles render. I will try tonight on my other pc if it works there.
Besides i am not able to report a bug via that discort portal, since its not opebning at all!
Best regards,
Heiner Stiller
I am really a bit anoyed now: Where can I report a bug, which renders the product useless To me? Here it seems not to work neiter loged in nor not loged in! Thats my third try to do so: I am getting with V1.8.2 the same errors like Stuart before, exept mine are in lines 418, 427 and 248. I am on Win 10, Blender 2.79 a and Cycles is activated!
Sort of with a wrinkled forehead,
Bildermensch
Sorry to hear that. Maybe this link to discord will work for you: https://discord.gg/uqVsPd. Without image it’s impossible to say what is wrong. You can try linking to image uploaded to eg. here: https://imgur.com/upload. Also get latest hair tool 1.8.9, blender from official website. And try restarting blender after enabling addon, and saving user preferences. Those are just general suggestions, without image I can’t help more.
I have tried buying this from the gumroad site 3 times and it keeps hanging up. is there another site or page that I can buy this plugin from?
Well from what I know it may be problem with paypal on gumroad – it happens from time to time – it that case it is matter of waiting some time until it ‘fixes itself’ (maybe wait 1 day). Or it may be problem with browser – try firerfox. I do not sell it in other places. Or contanct me throught this page contact form, and I will give you other payment option.
nvm I changed browser windows and it worked.
Hello Bartos,
I am now getting somewhere with your plugin: I have still way to go untill i understand all but untill then, maybe i can make a suggestion: Maybe you can set up a “workspace” with all hair tools arranged for easy acess and add it as an almost empty bend file to the add on. I found out that most of my troubles are caused, because i dont know where to look for the elements to contol hair tool. Just an idea which might the whole process more easy to access for newcomes and me 😉
Aside from that, I am exited!
Bildermensch
Well all the buttons for hair tool are accessible from ctrl+shift+h hotkey, or from the left tools panel. I feel there is no enough buttons in Hair Tool to make new workspace (btw. blender 2.7 series dosen’t support thing like workspace, but 2.8 will). The only blend file right now that comes with Hair Tool is the one for baking – acessible from left Tools panel -> Hair Baking -> open baking scene.
I can’t get the tilt angle to show up when trying to do curls after pressing F6. I see all the other options but not angle.
I replied it in your youtube comment but just for others: I think you may use latest daily blender builds, and it is breaking blender undo somehow. Try going into preferences -> Editing -> Enable ‘Global Undo’. Save preferences and restart blender. Hope it works :).
Hello! I’m really interested in this add-on can I make purely polygonal hair for game characters with it??
Well yes. Check this part of editing curve profile: https://youtu.be/iXjBCxesA_I?t=138 . With this and taper operator, you can create cone like hair strands. And then you can use interactive combing to define the hair style. And after that just convert to mesh with HT convert tool.
So I installed this on my new machine but the UV Hair plugin isn’t there — is this a separate install or am I missing something obvious? I can create hair just fine, but I can’t UV map it.
Ah, nevermind – I was an idiot. I did install and use it yesterday, but forgot to save user settings (so it wasn’t enabled again). But… here’s a question — I could have sworn the last time I used this (over a year ago, I think) you applied the UV to the mesh object and not to the ribbons, but now it says it only works on ribbons. Did something change or am I just being an old idiot again?
Well yes, the new worklow is that you do the uv in curve mode. Now you can preview texture on hair in curve mode, and this is less desctructive workflow compared to previous way. Here I explain the change: https://www.youtube.com/watch?v=gtbhmYEKGZE
I must be stupid. Bought your add on and wanted to update the latest version with the link you emailed me but cant get it to work.
Please help me out, where can I find how to install latest version?
thanks,
When you login to gumroad, in your bought items there should be link to Hair Tool. Just get the version with biggest number and install it like any other addon eg:. https://blender.stackexchange.com/questions/1688/installing-an-addon
Hi. yes, managed to install it, but can not seem to get the latest version installed into Blender. still have 1.8.9 version and can’t seem to figure out how to (WHAT) to install the later version. Probably a stupid version: do i need to REMOVE the old version in Blender user preferences first , and if yes, WHAT do I do after I done that? which file should i try to install?
thanks.
No there is not need to reset preferences. If you have old version installed you may use this button to get rid of old verrison:
http://prntscr.com/kq46f4 Then just follow video below:
And save user settings.
When will the addon be available for sale again?
Addon should be online again tomorrow, or 8th of september. But I think I will be forced to move to another selling platform (basically same as gumraod, but they give me no trouble if I have UK company and Polish residency).
Addons are online again! I still deal with the problem, but with help of my accountant it should be resolved soon.
I purchased this today but when I went to preferences, then to addon, I clicked on the zip file. It did not load. Is there a step I missed?
Maybe you saved the zip file to your AppData\Roaming\Blender Foundation\Blender\2.79 ? Then blender will have problem with installing it complaining that zip file should be outside of addons folder. To fix just move zip file to eg. desktop and install it from there. Or second way: just manually extract zip file to: C:\Users\YourUserName\AppData\Roaming\Blender Foundation\Blender\2.79\scripts\addons\hair_tool
I have tried to upload it from the desktop to no avail. The newest Blender is 2.79b, does that make a difference?
Alright!!! I finally got it to load, thanks.
Sorry, it is saying the file already exists, so it must have uploaded. It’s not showing up in the addons menu which is why I didn’t think it uploaded.
What was the problem?
sorry about the delay. I downloaded all the files and tried to upload that instead of the last version 🙂
Will the price include updates?
Yes, updates are for free.
Hello Bartosz,
is the Hair add on compatible wit Blender 2.8 already?
Thanks for the info!
Heiner Stiller
Not yet. I started the update but there is bug in blender 2.8, so I had to halt the development until it is fixed.
Ok, I guess you will announce when it is ready!
Hi Bartosz,
tried your 2.0.2 on latest Blender build (downloaded this morning, ie 28.1.2019) build and there’s error when installing – Traceback ….. etc
Regards
Vojtěch
I can’t replicate this bug (latest daily build). Can you try removing :
C:\Users\_YourUserName_\AppData\Roaming\Blender Foundation\Blender\2.80\scripts\addons\hair_tool
Restart blender, and install again?
I did this of course, removed directory. Installed via addon manager and copied manualy, still errors. There’s screenshot, this morning B3d build http://prntscr.com/mdnmzd
Ok, there seems to be conflict maybe with other addon. Last line says that there is already registered ‘CUSTOM_NODES’ class. The only thing I can suggest is disabling other addons, that may be modifying blender nodes. I will change ‘CUSTOM_NODES’ name to something else, in next update, so hopefully this conflict wont happen in future.
Thank you!
Hi. I think I’m going to purchase the add-on. I’ve been following you and I find useful for some of my projects now and it’s good you bring it to 2.80. Do you include some demo files with it? I guess it could be useful.
Thanks
Yes, there is example blend file, but it is for old blender 2.79. I contains character with some chairs, example of grid meshes, that were used to generate curve hair ribbons.
Thanks for your quick answer. Well, it could work. I’m going to create some antropomorphic characters with fur, you know. I was looking for some example like you posted recently. I think it was a dog or similar what you posted some days ago.
Hey there.
In Blender 2.8, there is no search box showing up when pressing spacebar in the uv editor, so I can’t access the operator… any way around this?
Cheers…
Never mind… found the solution. In 2.8 preferences, you need to enable search functionality when pressing spacebar, instead of having it play the timeline… all the best
I downloaded the latest version and it didn’t show up. So I tried reloading the previous verion, still didn’t show up. Now when I try to enable it in the addons, I’m getting this error: https://scontent-sea1-1.xx.fbcdn.net/v/t1.0-9/65482276_879243869078853_5035107675700985856_o.jpg?_nc_cat=109&_nc_oc=AQn9mBLJDmMhpZy-XZjeegnJpIJhQ25VWcgdk88Q1RKB9_fNyRv9Zv4CsJSZ6GO11sg&_nc_ht=scontent-sea1-1.xx&oh=d37b59f16ecb2b9a735b023258d8eaf9&oe=5D7F7F42
I cannnot see the left part, but I think you may be using wrong blender for HTool 2.x. Use blender 2.8 for HTool 2.x releases.
I download 2.8 and the interface is all different. It used to show up on the left side with objects. Now I can’t find it.
In blender 2.8 left panels are gone. I moved HTool panel to right side.
Ah! I got it!
Hi Bartosz
And thank you for this amazing addon.
Is the anisotropic lighting only work when you draw your strands with “D”?
When you create strands from a grid i don’t see any lighting connected to my strands nor material.
Is it something you’re working on or do you have any advice to setup a nice lighting directly connected to the new created strands?
Personally, for my new personal short film project, i would like to be able to deal with the lighting of my hairs outside the overall lighting of the scene so if you have a tip i would really appreciate it.
Thanks
Hi Cedric
The hair shader is custom made and the aniso speculra is fake – works only with special light created when you import build in hair material in Hair Tool. When you create curves from grid surface the material will be automatically added: http://prntscr.com/ogv4sg
About hair shader – if you are using Cycles there is option for anisotropic specular. And there is hair shader tool. https://docs.blender.org/manual/en/latest/render/cycles/nodes/types/shaders/hair_principled.html
Hello Bartos,
I am having a little trouble with the material. I am trying to do that interactive hair grooming example: I create sphere, I create hair system, set hairs to a nice length, reduce amount of hairs to 200. Then I switch to grooming, in in the N menu i open hair tool and create settings, activate the option “Interactive Curve Ribbons” and nothing … I can groom and all, but the hair material gets not created 😦
Render engine is set to eevee. What I am missing here?
Thanks for helping me out.
Cheers
Heiner
I can recreate this problem. Can you send the blend file? YOu can use discord for support: go to addon preferences -> hair tool -> report bug button. It will direct you to addond suppord discord channel.
I am trying to install add on for garment and hairs to 2.8 without any success… wonder if this happens to others?
Can you provide more detail on: https://discord.gg/cxZDbqH – addon discord support channel ?
I believed i got it to work as soon as I was going to go to discord to post my problem… sorry for the troble. Thanks for your great toolS!
Hey, after converting the curves into mesh how can i bake the textures to apply textures on engines etc?
The mesh hair ribbons are just ordinary mesh with UV’s. You can export it to any engine as obj or fbx. You can create textures using build in hair baking: https://joseconseco.github.io/HairToolDocs_28/texture_baking/ . Then you will have texture maps as png, images which can be exported to any engine. Just make sure your generated texures are matching mesh hair uv’s.
Hello!
I am coming back to use the Hair Tool after a really big time away from the tool and I saw that the addon have now a new function that creates the low poly hair by using particle hair in the model.
At this moment I am finishing a character for a game design project and I thought that this function would be perfect to make the beard and eyelashes of the character, but I need to know first:
Does this function follow the mesh rig/movement (like Blend Shape)?
If yes:
Can the model be exported to the engine with this function?
If not:
Do you know a way that I can take de Hair Tool to make the Low Poly hair following the character’s mesh?
Since now, thanks for your attention. 🙂
Cheers!
For transferring shape keys I developed this addon: https://gumroad.com/l/shape_transfer (you may try googling for some free addons for that, but not sure If any will work). As for rig deformation – you can weight paint hair cards like any other mesh. Best way would be using ‘data transfer modifier’ to transfer weights from head to hair. Then your hair can be exported to any game engine just like any other mesh
Thanks for the help, I’ll try it soon as I be able to buy the addon! 🙂
By the way, do you have a tutorial showing how it works? So I can understande better the tool befores buy it.
About the data transfer, thanks for the sugestion, I had never used the data transfer modifier, so I’ll search more about and give it a try! 🙂
I bought this product and when the blender upgraded I could not get it again and the creator not responding
Hi Michael – for support please use: https://discord.gg/cxZDbqH – addon discord support channel. Or you can contact me from this site -> About page.
Hi I bought your addon long time ago( version 1.92), I did not have gumroad acount, just bought it, no way for me to go back to gumroad. I cant update. how can I get help
You should have received email from gumroad with download link. There is no need to have gumroad account for this. Maybe if you cant find the email from gumroad, then you can give me your email address – and I will re-send the purchase email to you.
Unfortunately the email was from yahoo and now is gone due to yahoo new rules, I dont even have it now, was long time ago. Honestly I’m not even entirely sure that was the email. I guess the only option left for me to order it again.
Since I do not have way to verify your purchase, the best I can offer is to offer you discount for new version (50% ). Please contact me using: https://discord.gg/cxZDbqH
Hi bartoszstyperek,
Very grateful for your kindness, I’am very new to Discord, trying to understand how things works around there, but it says you don’t have permission to send messages in this channel , I can write
a message in test-channel and etc… if that is what you ment, or if you wish you can email me
as well.
regards
You can always go to – ‘About me’ page and send email from there.
O.K. I sent you the email. Thanks